Android
scrcpy Puts My Android Phone on My Mac for Free
One of the most useful things I have added to my Mac recently is a window into my Android phone. The app is called scrcpy, pronounced “screen copy,” and the idea is straightforward: connect your phone and bring its screen onto your computer. You can interact with it using your keyboard and mouse instead of […]
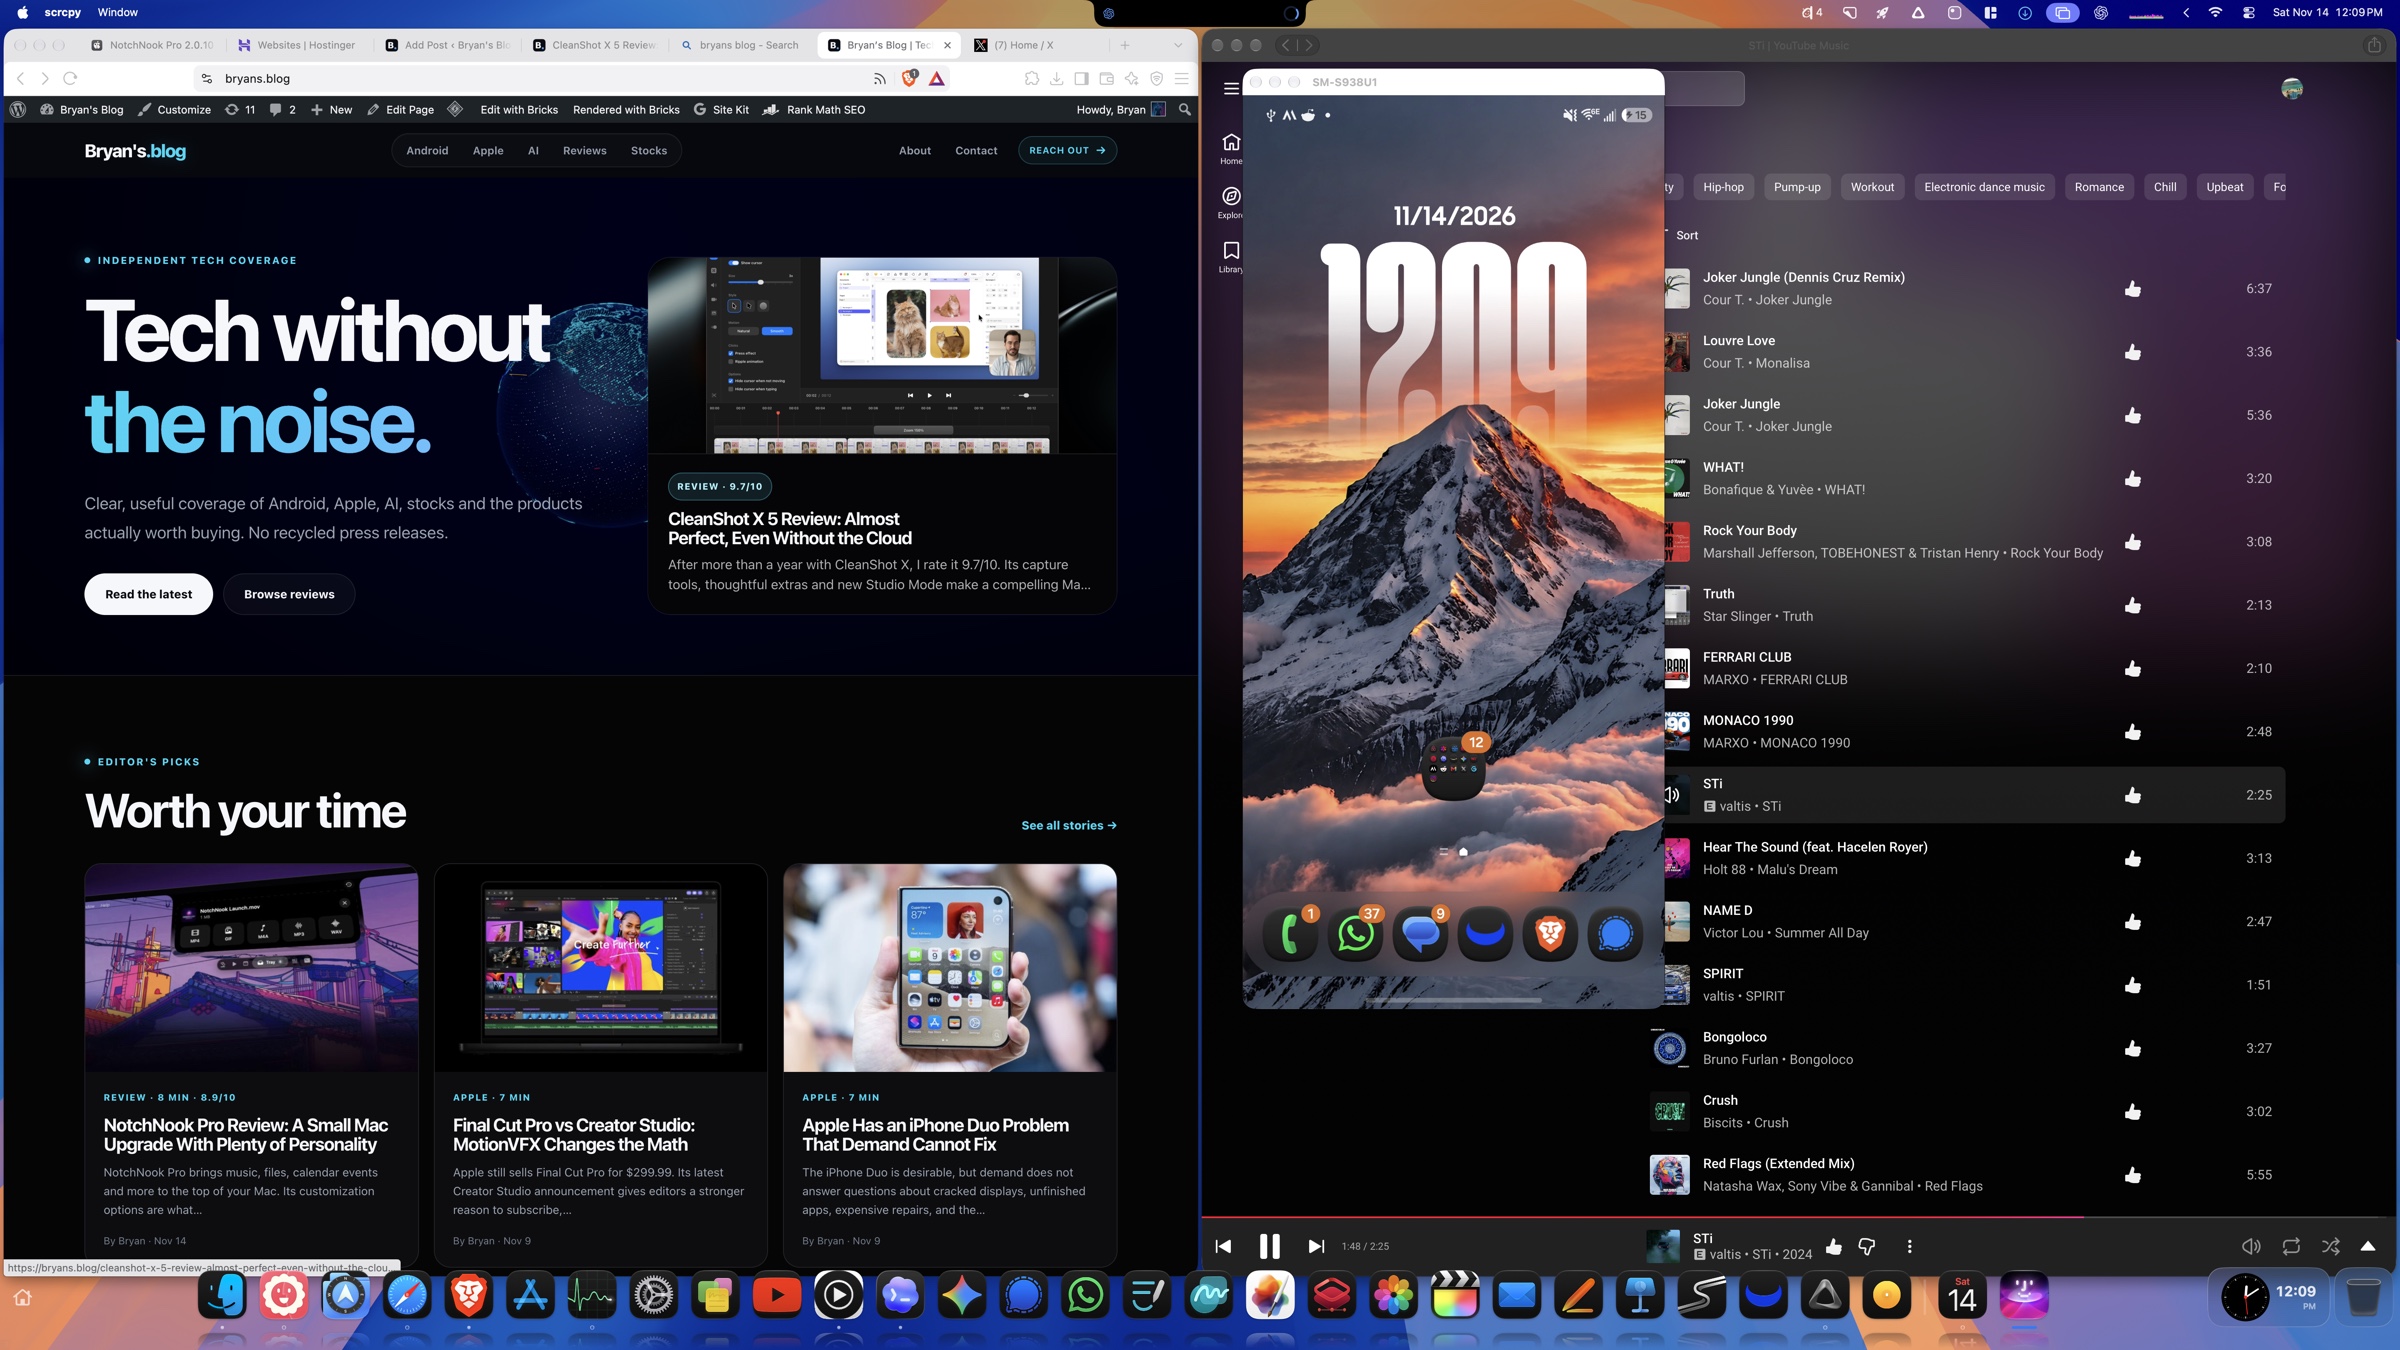
One of the most useful things I have added to my Mac recently is a window into my Android phone.
The app is called scrcpy, pronounced “screen copy,” and the idea is straightforward: connect your phone and bring its screen onto your computer. You can interact with it using your keyboard and mouse instead of continually reaching for the device. It supports USB and wireless connections, and it is free and open source. Official scrcpy project.
For me, it works great. Having the phone within easy reach on the Mac is the attraction, and launching it has become particularly convenient through the terminal tab in NotchNook Pro.
Open the tab, type scrcpy, and the phone gets its own window.
It is a small addition that makes using Android alongside a Mac feel much more practical.
My Actual Setup
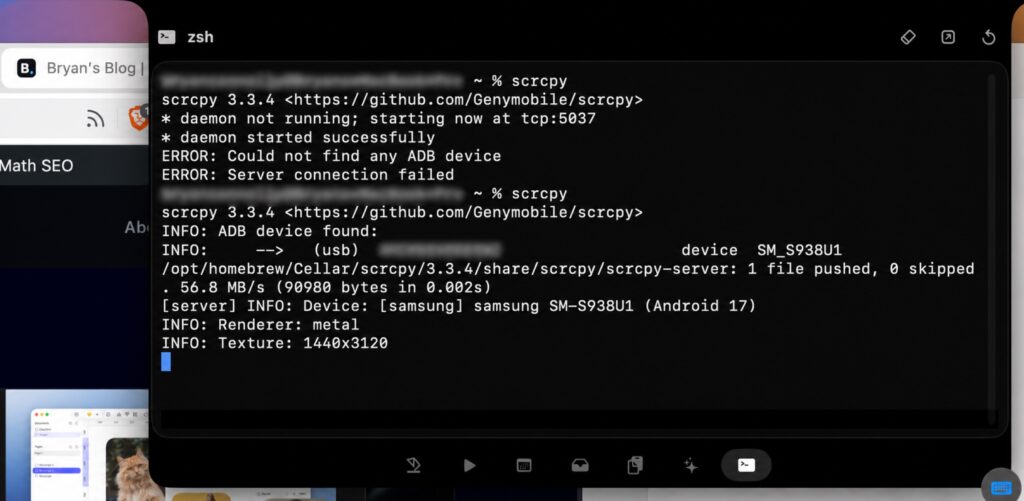
My connection log shows scrcpy 3.3.4, a Samsung SM-S938U1 running Android 17, and a USB connection. On the Mac side, it reports the Metal renderer and a texture size of 1440 by 3120.
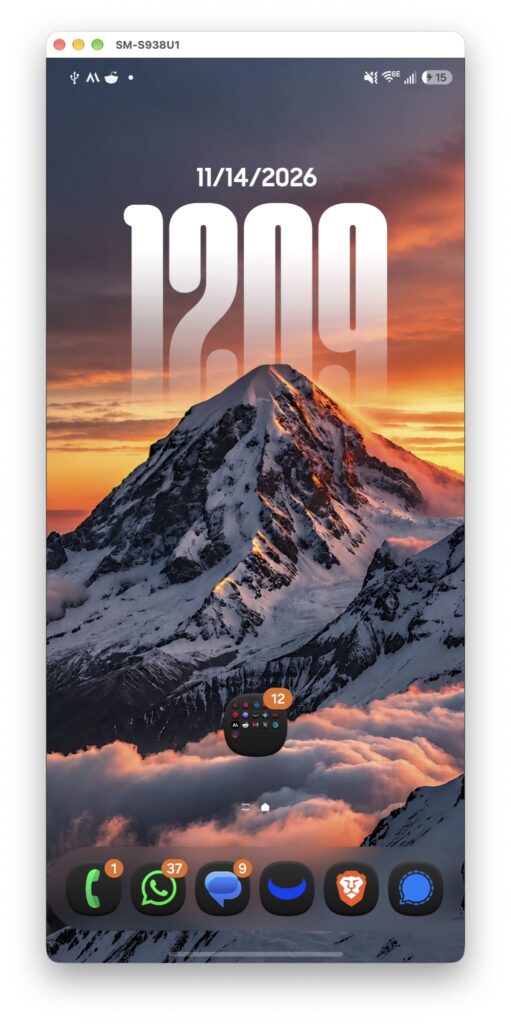
The screenshots show the result: my phone’s home screen inside a normal Mac window, sitting alongside the apps and websites I already have open.
That is what makes the setup useful. The phone stays part of the desktop instead of becoming another thing to pick up every time I need something from it.
The version number here describes my installed setup. Check the official releases for the current download. The commands below are documented for the 3.3.4 version shown in my screenshots.
A Real Phone in a Desktop Window
scrcpy mirrors the Android device you connect. Your phone runs its own apps and supplies the screen; the Mac displays it and can send keyboard and mouse input back. The project supports macOS, Windows and Linux, without requiring root access or a permanent app installation on the phone. How scrcpy works.
For someone moving between Android and macOS, the appeal is obvious. A phone app can remain nearby while you write, browse, compare information or work on something else.
It also makes sense for demonstrating Android software. Showing a setting or explaining how an app behaves is easier when the phone’s screen is already visible on the computer.
My favorite part is the easy access. It works well enough in my setup that the connection becomes useful rather than something I keep thinking about.
Launching It From NotchNook Pro Is Particularly Handy
I recently reviewed NotchNook Pro, and its terminal tab gives me another reason to keep using it.
I can open the terminal from the notch and run:
scrcpyThat launches the mirroring session in a separate window. NotchNook provides a convenient place to enter the command, while scrcpy handles the connection and the phone display.
It is a good example of two small utilities fitting together. One puts a terminal within reach. The other brings the phone onto the desktop.
You can launch the same command from the Mac’s Terminal app too. Once connected, keep the terminal session running while you use the phone window. Press Control+C in that session when you want to stop it.
Getting Started on a Mac
If you already use Homebrew, the official macOS instructions list:
brew install scrcpyYou also need Android Debug Bridge, usually called ADB. If it is not already installed and available to your terminal, the documented Homebrew command is:
brew install --cask android-platform-toolsThe project also provides Mac downloads through its releases. Follow the official macOS installation instructions for the route you choose.
On the phone, enable Developer options and USB debugging, connect it with a USB cable that supports data, and accept the debugging authorization prompt for your own Mac. Google documents the Android device setup.
Then run scrcpy.
There is some setup involved, especially if you have never used Android debugging before. Once that connection is established, the everyday command is pleasantly short.
The First Attempt Did Not Find My Phone
My terminal output includes an unsuccessful attempt before the working connection:
ERROR: Could not find any ADB device
ERROR: Server connection failed
The next run found the Samsung phone over USB and initialized the display:
INFO: ADB device found:
[server] INFO: Device: [samsung] samsung SM-S938U1 (Android 17)
INFO: Renderer: metal
INFO: Texture: 1440x3120
The important troubleshooting step is to check whether ADB can see the phone:
adb devicesIf the list is empty, check USB debugging and the cable connection. If it lists the phone as unauthorized, unlock the phone and accept the authorization prompt. A device listed as device is connected and authorized. The project’s ADB troubleshooting guide explains the common cases.
The initial message about starting the ADB daemon is normal when the service is not already running. The useful distinction is whether a device appears afterward.
If more than one device is connected, this selects the single USB device:
scrcpy --select-usbSee the connection options for selecting a particular device when needed.
You Can Use It Wirelessly Too
USB is the connection shown in my log, but scrcpy also supports mirroring over the network.
One documented way to start is to connect the phone over USB first, put the phone and Mac on the same network, and run:
scrcpy --tcpipscrcpy can then configure the ADB network connection and start the session. Once the network session is established, you can unplug the USB cable. Android also has a wireless debugging pairing method on supported versions. The wireless connection documentation covers both approaches.
That flexibility makes the idea more useful. You can keep a cable connection when it suits your desk, or use a wireless session when you want the phone nearby without leaving it plugged into the Mac.
Use a trusted private network and turn off network debugging when you are finished with it. Wireless responsiveness will depend on the connection as well as the phone and computer.
A Few Commands Worth Knowing
The basic command is enough to get started. A few options help you tailor the window and the stream without learning the entire command reference.
Keep the phone window above other apps:
scrcpy --always-on-topUseful if the phone is acting as a reference while you work elsewhere. Window options.
Limit the image size and frame rate:
scrcpy --max-size=1920 --max-fps=60The size limit applies to the longest dimension while preserving the phone’s proportions. Reducing it can ease the workload. The frame rate setting is a ceiling, rather than a guarantee of 60 frames per second. Video options.
Mirror without forwarding audio:
scrcpy --no-audioAudio forwarding is supported on Android 11 and later, with version specific requirements. Turning it off is handy if you only want the display and controls. Audio options.
Keep mirroring with the physical phone screen off:
scrcpy --turn-screen-off --stay-awakeThe stay awake option applies while the phone is connected to power. The device controls explain how these settings behave.
Record the phone directly to a file:
scrcpy --record=android-demo.mp4That records while mirroring, which is useful for an Android walkthrough or demonstration. The file is written in the terminal’s current folder. Recording instructions.
These are options to explore as you need them. My own starting point remains the simplest one: launch scrcpy and use the phone window.
The Tradeoff Is the Setup
The appeal of scrcpy is how much it offers for free. The compromise is that its official workflow expects some comfort with a terminal, ADB and Android debugging settings.
If you want a guided app with large buttons for every setting, this approach may take some getting used to. Connection errors can also require a little troubleshooting before the phone appears.
For me, that setup is worth it. Once the connection works, I get convenient access to the phone without a subscription or an extra account.
It is especially useful if you already work on a Mac while using an Android phone. The two devices can remain part of the same workspace, even though they run different operating systems.
A Small Utility That Earns Its Place
scrcpy does something I want every day from a good utility: it puts a useful capability within easy reach.
My Android phone gets a window on the Mac. I can launch it quickly from NotchNook Pro’s terminal tab. USB and wireless options give it flexibility, while recording and display controls provide room to do more later.
It works great in my setup, and the easy access is the reason I keep coming back to it.
If you use Android alongside a Mac and have been looking for a practical way to bring the phone onto your desktop, scrcpy is worth trying.

Written by
Bryan
Independent technology coverage focused on useful context, real-world experience, and honest recommendations.